학교를 졸업하는 기념으로 새로운 활동을 한번 해보고 싶어서 2024년 6월 10일부터 8월 6일까지 진행하는 Gemini 스터디잼에 참가했다. Gemini for Google Workspace 와 Intermediate: Gemini for Google Cloud Learning Path 과정의 코스를 모두 완료해야했다. 짧은 시간이었지만 GenAI 사용하여 개발 생산성을 향상 시킬 수 있는 다양한 use case들을 미리 경험해볼 수 있어서 좋았다. 먼저 Google Cloud Skills Boost 회원가입 후 Google Study Jam에서 제공하는 크레딧 쿠폰 링크를 클릭하면 대략 100 크레딧 정도가 적립되는데 나는 108 크레딧 정도가 적립되었던 것 같다. 각 코스를 수행할 때마다 1 크레딧에서 5 크레딧 정도가 차감되는 방식으로 진행되는데 전부 다 수행하고도 52 크레딧 정도가 남았을만큼 넉넉하게 제공되는 편이다. 그리고 Lab 실습마다 새로운 구글 계정이 부여되기 때문에 깔끔하게 처음부터 크롬 시크릿 창에서 하는 것을 권장한다.
Gemini for Google Workspace
Contents
- Introduction to Gemini for Google Workspace
- Gemini in Gmail
- Gemini in Google Docs
- Gemini in Google Slides
- Gemini in Google Sheets
- Gemini in Google Meet
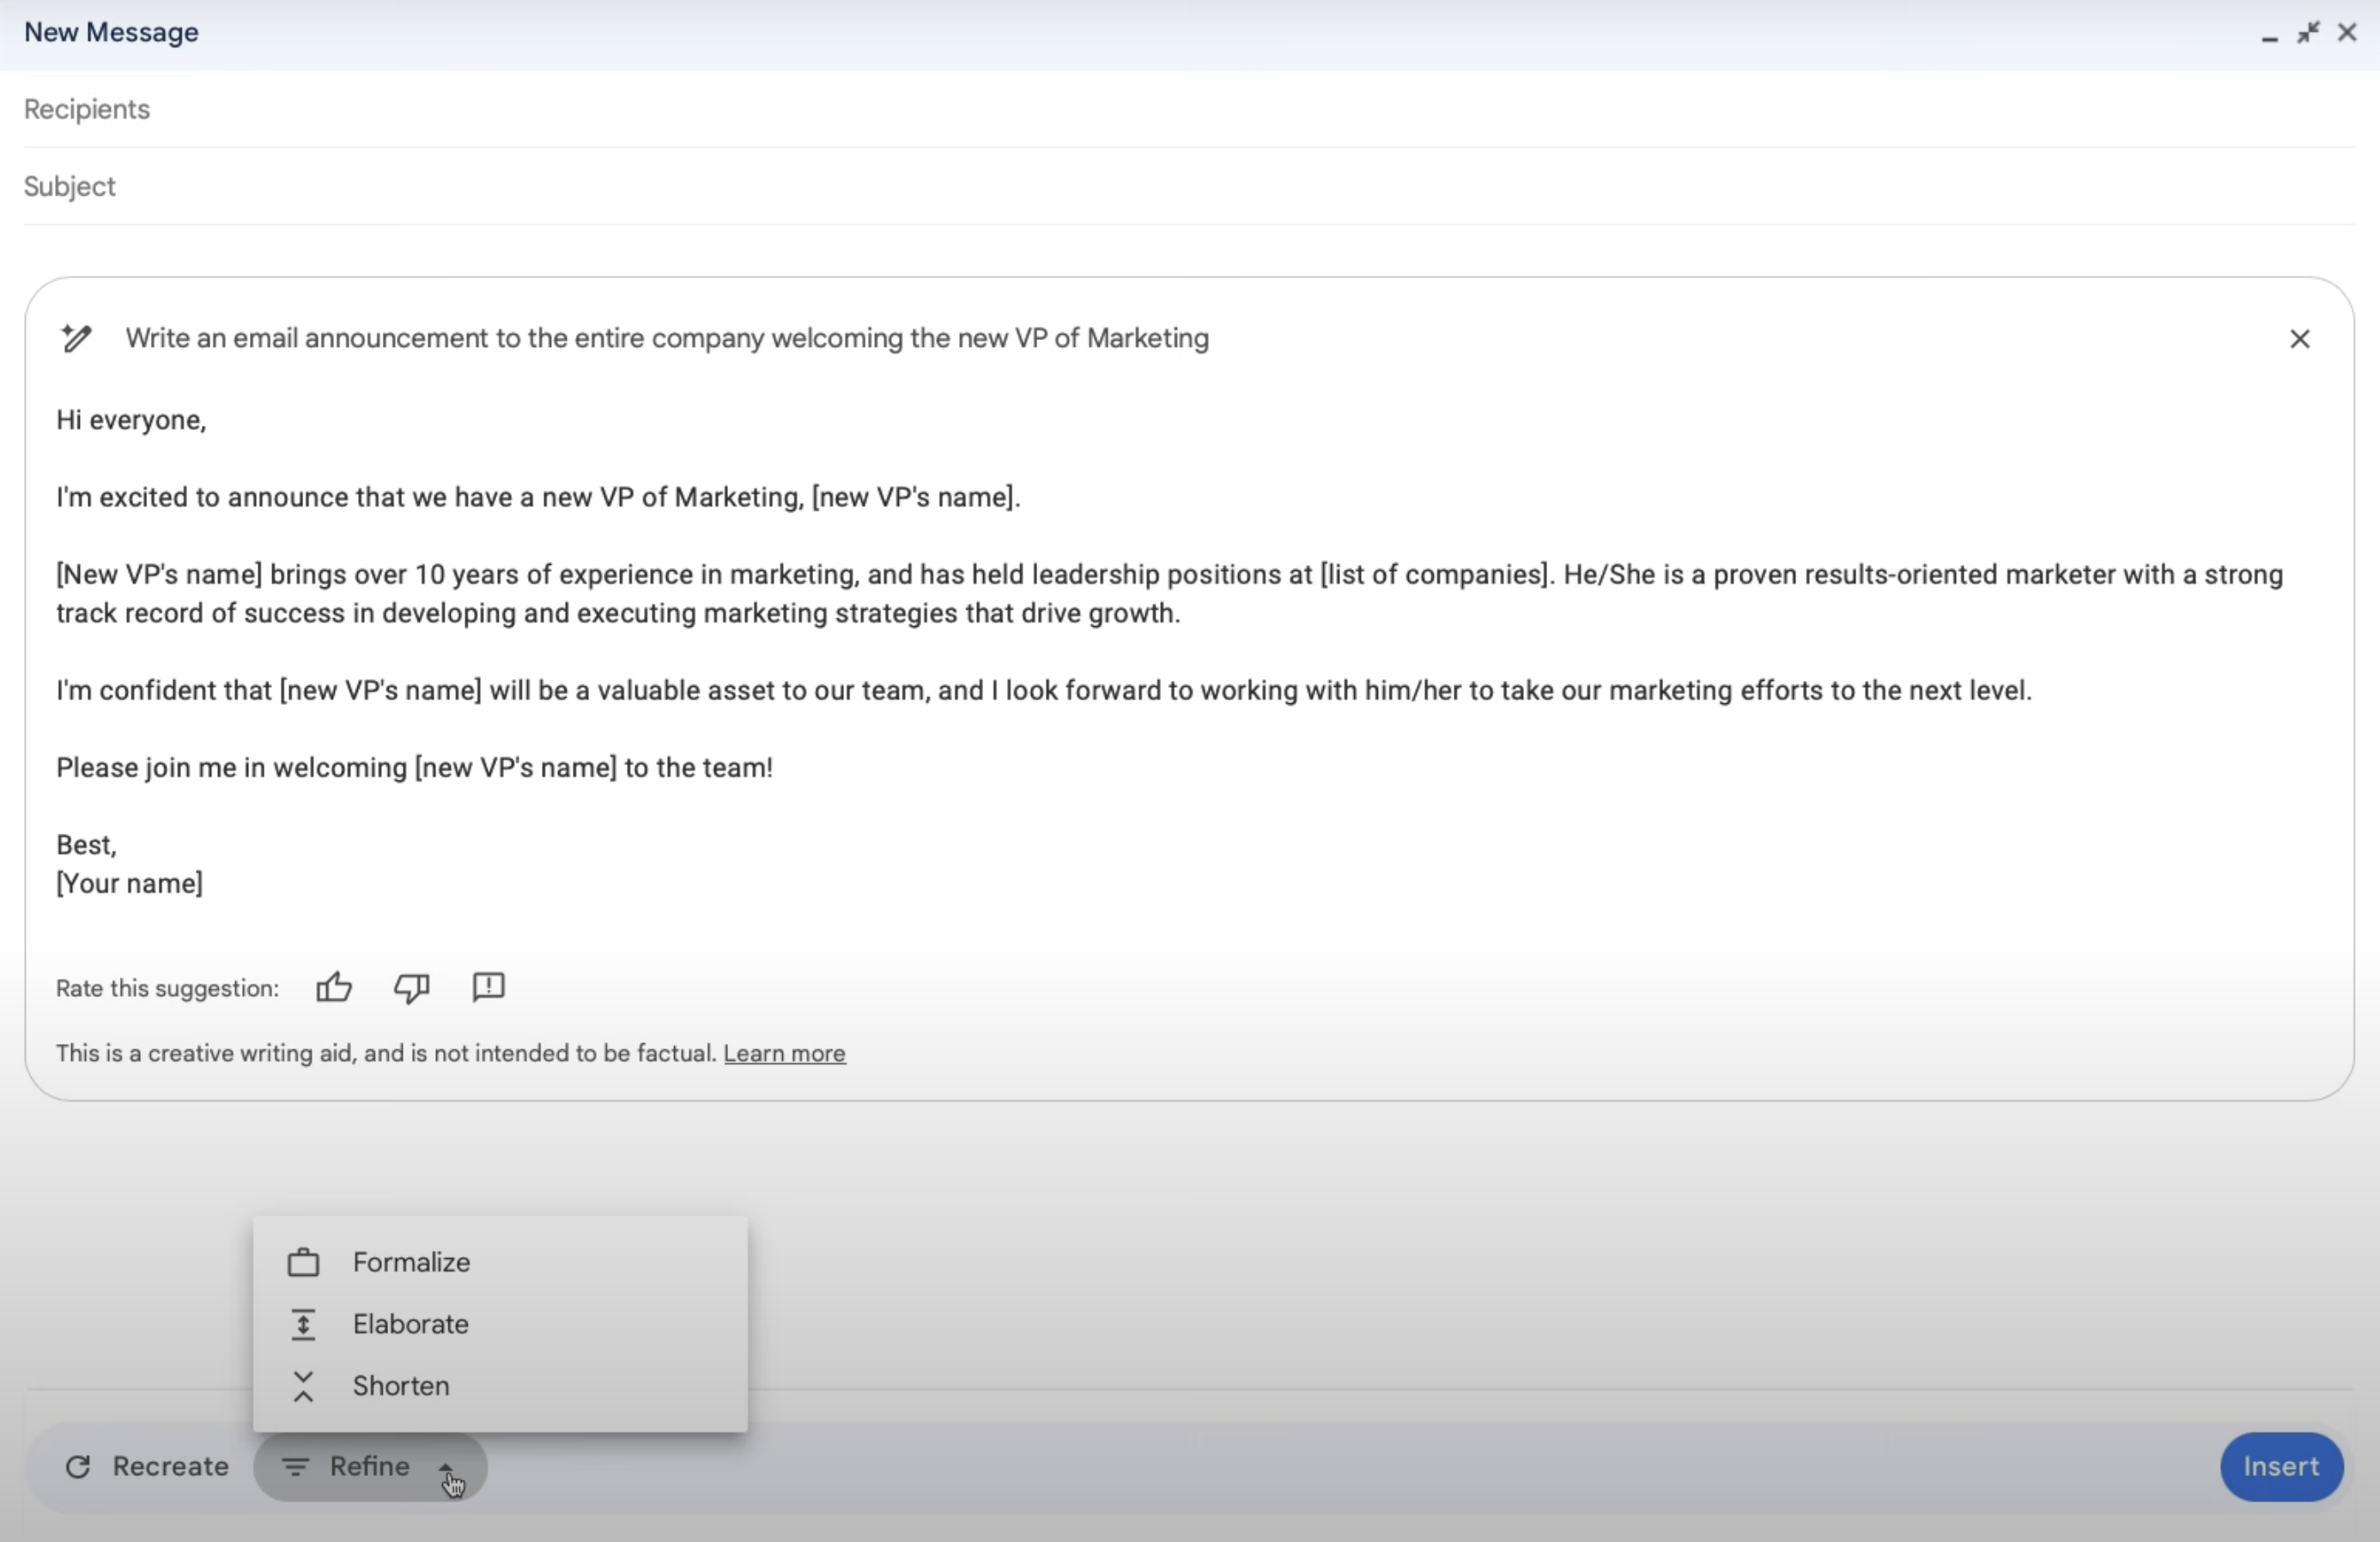
이 과정에서는 Gmail, Google Docs, Google Slides, Google Sheets, Google Meet에서 제공되는 Gemini 기능을 활용하여 어떻게 업무의 생산성을 높일 수 있는지 배울 수 있다. 실습은 따로 없고 동영상만 쭉 보면된다. 인상 깊었던 것 몇 가지를 정리하면 Gmail을 작성할 때 “Help me write” 버튼을 이용하여 이메일 초안을 생성할 수 있고 생성된 초안을 직접을 수정하거나, Formalize, Elborate, Shorten중에 하나를 선택하여 글을 수정할 수도 있다.
그리고 Google Docs에서도 프롬프트로 원하는 문서를 쉽게 작성할 수 있는데, 특히 마음에 들었던 점은 작성된 문서의 단어, 문장 구조, 문장의 능동/수동 형태, 문장의 간결성 등으로 구성된 filter suggestion에서 원하는 것을 필터를 선택하고 선택한 필터에 맞춰 문서를 교정해준다는 것이다. 이 때 맞춤법 검사 웹사이트처럼 수정할 부분을 여러가지 제안해주면 마음에 드는 것을 클릭하여 문서에 반영할 수 있다. Google Slide에서는 원하는 이미지를 프롬프트와 원하는 스타일(ex. 실사, 그림 등) 을 선택하여 여러 이미지 후보군을 생성하고 그 중에서 원하는 이미지를 선택하여 바로 슬라이드에 추가할 수 있다. Google Sheet에서는 프롬프트로 기본 템플릿을 만들 수 있는데 예를들어 “고객이 웹페이지에 얼마동안 멈춰 있는지 추적해줘” 라는 프롬프트로 입력하고 만들기를 클릭하면, Date, Page, User, Timestamp, Duration, Action Taken의 컬럼을 가진 테이블을 만들고 예시 데이터도 함께 추가해준다. Google Meet에서도 원하는 background 이미지를 만들 수 있는 기능도 있고, 영상 화질개선이나 실시간 자막 번역의 기능도 함께 제공해준다. 하지만 이 AI 기능들은 무료로 제공되지 않고 Google Workspace에서 사용하려면 Google Worspace 요금제 에서 한가지를 구독한 상태에서 Gemini for Google Workspace 를 추가로 구독해야 사용할 수 있고 Google One 을 사용하는 사람이라면 AI Premium 구독을 하면 사용할 수 있다. 대략 1인당 대략 20~30 달러를 추가로 내야 사용할 수 있는 기능인데, 나중에 AI 가격이 저렴해져 무료로 사용할 수 있는 날이 왔으면 좋겠다. 구글 워크스페이스를 위한 듀엣 AI를 소개합니다 글에서 Google Workspace에 추가된 기능을 GIF 형태로 볼 수 있다.
참고로 구글의 AI 서비스는 다양한 이름을 사용하고 있었는데 예를들어 Google Workspace에서는 Duet AI로, 대화형 AI 챗봇 서비스는 Bard로 불리고 있었지만 2024년 2월 쯤에 전부 Gemini로 리브랜딩 되었다. 복잡하지 않고 오히려 좋은 것 같다. 그리고 Gemini 챗봇 의 설정에서 구글 워크스페이스, 구글 지도, 구글 항공편 검색, 구글 호텔, 유튜브를 확장 프로그램을 추가할 수 있고, Gemini를 통해 개인 이메일, 문서, PDF에서 정보를 찾고, 요약하여 답변을 얻을 수 있다. “Gmail에서 최근에 받은 캠퍼스 투어 예약 일정을 요약해서 날짜와 시간이 포함된 표로 정리해 줘.“와 같이 요청할 수 있다. Gemini에서 채팅 형식으로 지메일을 검색했을 때 아직 제대로 된 답변을 주지 못하거나 정보를 누락하는 경우가 종종 발생하는 것 같아서 자주 사용할 것 같진 않지만 팬심으로 가끔씩 들어와 써볼 것 같긴하다.
Intermediate: Gemini for Google Cloud Learning Path
Contents
- Gemini for Application Developers
- Gemini for Cloud Architects
- Gemini for Data Scientists and Analysts
- Gemini for Network Engineers
- Gemini for Security Engineers
- Gemini for DevOps Engineers
- Gemini for end-to-end SDLC
- Develop GenAI Apps with Gemini and Streamlit
전체적으로 GCP의 gemini 기능을 활용하여 개발하고 인프라를 구축하는 방법에 대해 알려준다. 모르는 것이 있으면 밖으로 이동하지 않고 GCP내의 gemini를 통해 물어볼 수 있는데, GCP와 관련된 질문 뿐만 아니라 “임진왜란은 언제 일어났어?“와 같은 general한 질문에 대한 답변도 받는걸 보아 GCP와 관련된 내용에 대해서만 응답 해주는 것은 아닌 것 같다. 한가지 불편했던 점은 채팅 히스토리에 대한 context가 없는 상태로 답변을 해준다는 점인데 예를들어 영어로 답변을 받자마자 바로 이어서 “한글로 번역해줘” 라고 입력했는데 제대로 된 응답을 하지 못했다. Reddit의 반응도 그렇게 좋아보이진 않는다.
앞의 Gemini for Google Workspace 과정과 다른 점은 코스마다 Lab이 있다는 것이다. Start Lab 버튼을 누르면 제한 시간이 주어지고 제한 시간동안 사용할 수 있는 구글 계정 정보와 GCP 프로젝트 ID를 전달해준다. Gemini for Application Developers에서 Gemini for end-to-end SDLC 코스까지는 동일하게 아래와 같은 설정을 해주고 랩을 시작한다.
# PROJECT_ID, REGION 환경변수 설정
PROJECT_ID=$(gcloud config get-value project)
REGION=lab region
echo "PROJECT_ID=${PROJECT_ID}"
echo "REGION=${REGION}"

# 구글 사용자 계정 환경변수 설정
USER=$(gcloud config get-value account 2> /dev/null)
echo "USER=${USER}"

# Cloud AI Companion API for Gemini 활성화
gcloud services enable cloudaicompanion.googleapis.com --project ${PROJECT_ID}

#  사용자 계정에 필요한 IAM 역할 부여
gcloud projects add-iam-policy-binding ${PROJECT_ID} --member user:${USER} --role=roles/cloudaicompanion.user
gcloud projects add-iam-policy-binding ${PROJECT_ID} --member user:${USER} --role=roles/serviceusage.serviceUsageViewer
그리고 인상 깊었던 몇가지 코스를 소개하고자 한다.
Gemini for Data Scientists and Analysts
[Lab] Analyze data with Gemini assistance
BigQuery를 이번 기회에 처음 사용해보았다. 그동안 AWS Athena를 사용했던 사람으로서 신기한 점이 몇가지 있었다. 첫번째로는 데이터를 업로드 하자마자 바로 쿼리할 수 있다는 점이다. AWS Athena에서는 S3에 데이터를 저장하고 Glue Crawler 또는 수동으로 데이터 카탈로그를 생성한 후에 쿼리를 실행할 수 있지만 BigQuery에서는 스키마 Auto-detection 기능을 지원하기 때문에 csv 파일을 업로드 하자마자 바로 쿼리할 수 있었다. 물론 커스텀하게 스키마를 정의할 수도 있다. 두번째는 스토리지를 BigQuery에서 직접 관리한다는 것이다. AWS Athena에서는 S3에 데이터가 저장되기 때문에 S3에서 스토리지 저장 비용이, AWS Athena에서 쿼리된 데이터의 양에 따른 비용이 각각 청구되지만 BigQuery에서는 기본적으로 스토리지 비용과 쿼리 비용이 함께 청구된다. 물론 BigQuery는 데이터 웨어하우스로 분류되기 때문에 AWS Athena보다는 AWS Redshift와 하는게 적절해 보이지만 AWS Athena를 주로 사용했었기 때문에 한번 비교해봤다.
BigQuery에서는 SQL 쿼리를 생성하기 위해 Gemini 기능을 활용할 수 있는데 크게 Auto completion, Auto generation, Explanation 기능을 사용할 수 있다. 예를들어 쿼리 콘솔에서 #을 입력하고 원하는 프롬프트를 이어서 작성한 후 엔터를 누르면 바로 아래에 SQL이 생성된다.
# select the sum of sale_price by Date(created_at) and product_id casted to day from bigquery-public-data.thelook_ecommerce.order_id as t1 joined this with products table in the same dataset as t2
SELECT
    SUM(sale_price),
    DATE(created_at) AS created_at_day,
    CAST(product_id as INT64)
FROM `bigquery-public-data.thelook_ecommerce.order_items` AS t1
JOIN `bigquery-public-data.thelook_ecommerce.products` AS t2 ON t1.product_id = t2.id
GROUP BY created_at_day, product_id
또한 BigQuery에서 SQL로 머신러닝 모델을 생성하고 관리할 수 있도록 지원하는데 CREATE MODEL 명령어를 통해 모델을 학습하고, ML.EVALUATE 또는 ML.ROC_CURVE 등의 평가함수를 사용하여 모델의 성능을 평가할 수 있고, ML.PREDICT 또는 ML.FORECAST 등의 함수를 사용하여 새로운 데이터에 대한 예측을 수행할 수 있다.
-- Forecasting ML model 생성하기
CREATE MODEL bqml_tutorial.sales_forecasting_model
OPTIONS(
    MODEL_TYPE='ARIMA_PLUS',
    time_series_timestamp_col='date_col',
    time_series_data_col='total_sales',
    time_series_id_col='product_id') AS
SELECT sum(sale_price) as total_sales, DATE(created_at) as date_col, product_id
FROM `bigquery-public-data.thelook_ecommerce.order_items` AS t1
INNER JOIN `bigquery-public-data.thelook_ecommerce.products` AS t2 ON t1.product_id = t2.id
GROUP BY 2, 3;

-- Forecasting ML model 호출하기
SELECT *
FROM ML.FORECAST(
    MODEL `PROJECT_ID.DATASET_ID.MODEL_NAME`,
    STRUCT(
        7 AS horizon,
        0.95 AS confidence_level
    )
)
[Lab] Gemini for Data Scientists
이 Lab에서는 분석에 필요한 데이터를 따로 추출한 후에 K-means 클러스터링을 사용하여 5개의 유저 그룹을 만들고 각 클러스터에 알맞는 마케팅 문구를 작성해주도록 했다. 먼저 BigQuery에서 제공하는 thelook_ecommerce 공개 데이터 셋을 사용했고 여기서 분석에 사용할 정보만 따로 뽑아 customer_status 라는 새 테이블에 저장했다.
-- bigquery
CREATE OR REPLACE TABLE ecommerce.customer_stats AS
SELECT
  user_id,
  DATE_DIFF(CURRENT_DATE(), CAST(MAX(order_created_date) AS DATE), day) AS days_since_last_order, ---RECENCY
  COUNT(order_id) AS count_orders, --FREQUENCY
  AVG(sale_price) AS average_spend --MONETARY
  FROM (
      SELECT
        user_id,
        order_id,
        sale_price,
        created_at AS order_created_date
        FROM `bigquery-public-data.thelook_ecommerce.order_items`
        WHERE created_at BETWEEN '2022-01-01' AND '2023-01-01'
  )
GROUP BY user_id;
그리고 데이터프레임 형태로 읽어 KMeans 모델을 학습할 수 있다. 참고로 Lab 중간중간마다 Progress를 체크하는 부분이 있는데, 아래의 matplotlib으로 scatterplot을 그릴 때 시간이 너무 오래걸려 결국 통과하지 못했다.
import bigframes.pandas as bpd
from bigframes.ml.cluster import KMeans
from bigframes.ml.model_selection import train_test_split
import matplotlib.pyplot as plt

dataset_name = "ecommerce"
model_name = "customer_segmentation_model"
table_name = "customer_stats"

# Load dataset
df = bpd.read_gbq(f"{project_id}.{dataset_name}.{table_name}")

# Train
df_train, df_test = train_test_split(df, test_size=0.2,  random_state=42)
model = KMeans(n_clusters=5)
model.fit(df_train)
model.to_gbq(f"{project_id}.{dataset_name}.{model_name}")

# Predict
predictions_df = model.predict(df)

# Visualize
plt.scatter(predictions_df['days_since_last_order'], predictions_df['average_spend'], c=predictions_df['CENTROID_ID'])
plt.xlabel("days_since_last_order")
plt.ylabel("average_spend")
plt.title("Attribute grouped by K-means Cluster")
plt.show()
# 클러스터의 중심을 기반으로 각 클러스터의 평균 지출, 주문 수, 최근 주문일수의 특성값을 보여줌.
query = f"""
SELECT
    CONCAT('cluster ', CAST(centroid_id as STRING)) as centroid,
    average_spend,
    count_orders,
    days_since_last_order
FROM (
    SELECT centroid_id, feature, ROUND(numerical_value, 2) as value
    FROM ML.CENTROIDS(MODEL `{dataset_name}.{model_name}`)
)
PIVOT (
    SUM(value)
    FOR feature IN ('average_spend',  'count_orders', 'days_since_last_order')
)
ORDER BY centroid_id
"""

client = bigquery.Client(project=project_id)
df_query = client.query(query).to_dataframe()
df_query.to_string(header=False, index=False)

cluster_info = []
for i, row in df_query.iterrows():
    cluster_info.append(f"{row["centroid"]}, average spend ${row["average_spend"]}, count of orders per person {row["count_orders"]}, days since last order {row["days_since_last_order"]}")

cluster_info = (str.join("\n", cluster_info))
print(cluster_info)
# cluster 1, average spend $48.32, count of orders per person 1.36, days since last order 384.37
# cluster 2, average spend $202.34, count of orders per person 1.3, days since last order 482.62
# cluster 3, average spend $45.68, count of orders per person 1.36, days since last order 585.4
# cluster 4, average spend $44.71, count of orders per person 1.36, days since last order 466.26
# cluster 5, average spend $58.08, count of orders per person 3.92, days since last order 427.36
# 마케팅 문구 생성
prompt = f"""
You're a creative brand strategist, given the following clusters, come up with \
creative brand persona, a catchy title, and next marketing action, \
explained step by step.

Clusters:
{cluster_info}

For each Cluster:
* Title:
* Persona:
* Next marketing step:
"""
from vertexai.language_models._language_models import TextGenerationModel

model = TextGenerationModel.from_pretrained("text-bison")
response = model.predict(prompt, max_output_tokens=1024, temperature=0.4)
print(response.text)
Develop GenAI Apps with Gemini and Streamlit
[Lab] Introduction to Function Calling with Gemini
Function call은 기본적으로 prompt에서 특정 파라미터를 추출하는 기능을 가진다. 즉, 비정형 텍스트 데이터를 정형 필드로 변환하는 기능이 Function call의 가장 핵심적인 기능이다. 이렇게 Function에 정의된 엔티티를 추출하여 REST API 또는 클라이언트 라이브러리로 전달할 수도 있다. 아래와 같이 원시 로그 데이터를 가져와 오류 메세지에 대한 세부 정보가 포함된 정형 데이터로 변환할 수 있다.
extract_log_data = FunctionDeclaration(
    name="extract_log_data",
    description="Extract details from error messages in raw log data",
    parameters={
        "type": "object",
        "properties": {
            "locations": {
                "type": "array",
                "description": "Errors",
                "items": {
                    "description": "Details of the error",
                    "type": "object",
                    "properties": {
                        "error_message": {
                            "type": "string",
                            "description": "Full error message",
                        },
                        "error_code": {"type": "string", "description": "Error code"},
                        "error_type": {"type": "string", "description": "Error type"},
                    },
                },
            }
        },
    },
)

extraction_tool = Tool(
    function_declarations=[extract_log_data],
)

prompt = """
[15:43:28] ERROR: Could not process image upload: Unsupported file format. (Error Code: 308)
[15:44:10] INFO: Search index updated successfully.
[15:45:02] ERROR: Service dependency unavailable (payment gateway). Retrying... (Error Code: 5522)
[15:45:33] ERROR: Application crashed due to out-of-memory exception. (Error Code: 9001)
"""

response = model.generate_content(
    prompt,
    generation_config=GenerationConfig(temperature=0),
    tools=[extraction_tool],
)

response.candidates[0].content.parts[0].function_call.args

# 아래의 형태의 데이터를 얻을 수 있다.
# {
#     "locations": [
#         {
#             "error_message": "File not found: /path/to/file.txt",
#             "error_code": "404",
#             "error_type": "FileError"
#         },
#         {
#             "error_message": "Access denied for user 'admin'",
#             "error_code": "403",
#             "error_type": "PermissionError"
#         },
#         {
#             "error_message": "Unexpected token in JSON at position 15",
#             "error_code": "500",
#             "error_type": "SyntaxError"
#         }
#     ]
# }
여기서 추가로 외부 API call을 한 결과를 가지고 응답을 받고 싶다면 function의 args를 가지고 외부 API를 직접 호출하고 send_message를 한번 더 호출한다. OpenAI의
Function calling
과 사용방법이 거의 유사한 것 같다.
def extract_log_data(locations: list):
    # 외부 API 로직 추가
    return location

args = response.candidates[0].content.parts[0].function_call.args

response = chat.send_message(
    Part.from_function_response(
        name="extract_log_data",
        response={
            "content": extract_log_data(args),
        },
    ),
)
[Lab] Getting Started with the Vertex AI Gemini API and Python SDK Lab
이 Lab에서는 Vertex AI를 통해 Gemini API를 사용해볼 수 있다. Vertex AI는 Gemini 모델과 상호작용하기 위한 통합된 인터페이스를 제공한다. 현재 2024-08-05 기준으로 vertex AI에서 제공하는 모델은 아래의 표와 같다 ( 참조링크 ) Gemini Pro 모델은 텍스트와 코드를 생성하거나 채팅을 통해 다양한 자연어 처리 작업을 할 수 있다. Gemini Pro Vision 모델은 멀티모달 프롬프트를 지원하며 입력 프롬프트로 텍스트, 이미지, 비디오를 포함할 수 있고, 텍스트 또는 코드를 응답으로 받을 수 있다.
| Model | Version |
|---|---|
| Gemini 1.5 Flash | gemini-1.5-flash-001 |
| Gemini 1.5 Pro | gemini-1.5-pro-001 |
| Gemini 1.0 Pro Vision | gemini-1.0-pro-001 |
| gemini-1.0-pro-vision-001 | |
| Gemini 1.0 Pro | gemini-1.0-pro |
| gemini-1.0-pro-001 | |
| gemini-1.0-pro-002 |
이미지와 텍스트를 주고 텍스트를 생성하는 멀티모달을 처음 사용해봐서 신기했다. 고양이 그림과 그림을 설명하라는 프롬프트를 함께 넣으니까 그림을 텍스트로 묘사해주었다.
# Download an image from Google Cloud Storage
! gsutil cp "gs://cloud-samples-data/generative-ai/image/320px-Felis_catus-cat_on_snow.jpg" ./image.jpg

# Load from local file and prepare content
image = Image.load_from_file("image.jpg")
prompt = "Describe this image?"
contents = [image, prompt]

responses = multimodal_model.generate_content(contents, stream=True)

print("-------Prompt--------")
print_multimodal_prompt(contents)

print("\n-------Response--------")
for response in responses:
    print(response.text, end="") #  This is a photo of a cat walking in the snow. The cat is brown and white, and the snow is white. The cat is looking at the camera.
이 멀티모달 모델은 few-shot prompting도 지원한다. 이미지와 텍스트의 쌍을 입력으로 제공하고 새로운 입력을 추가하면, 모델이 이전 입력의 규칙을 이해하고 이에 따라 적절한 응답을 생성해주었다. 랜드마크와 함께 있는 런던과 파리의 이미지와 텍스트 쌍과 새로운 이미지를 입력으로 주었을 때 새로운 이미지의 도시 이름과 랜드마크의 이름을 출력해주었다. 경복궁이랑 잠실 롯데타워를 사진을 줘도 잘 답변했다.
# Load images from Cloud Storage URI
image1_url = "https://storage.googleapis.com/github-repo/img/gemini/intro/landmark1.jpg"
image2_url = "https://storage.googleapis.com/github-repo/img/gemini/intro/landmark2.jpg"
image3_url = "https://storage.googleapis.com/github-repo/img/gemini/intro/landmark3.jpg"
image1 = load_image_from_url(image1_url)
image2 = load_image_from_url(image2_url)
image3 = load_image_from_url(image3_url)

# Prepare prompts
prompt1 = """{"city": "London", "Landmark:", "Big Ben"}"""
prompt2 = """{"city": "Paris", "Landmark:", "Eiffel Tower"}"""

# Prepare contents
contents = [image1, prompt1, image2, prompt2, image3]

responses = multimodal_model.generate_content(contents, stream=True)

print("-------Prompt--------")
print_multimodal_prompt(contents)

print("\n-------Response--------")
for response in responses:
    print(response.text, end="")
그리고 영상과 텍스트 프롬프트를 입력으로 주었을 때도 텍스트 답변을 잘 생성해주었다.
file_path = "github-repo/img/gemini/multimodality_usecases_overview/pixel8.mp4"
video_uri = f"gs://{file_path}"
video_url = f"https://storage.googleapis.com/{file_path}"

IPython.display.Video(video_url, width=450)

prompt = """
Answer the following questions using the video only:
What is the profession of the main person?
What are the main features of the phone highlighted?
Which city was this recorded in?
Provide the answer JSON.
"""

video = Part.from_uri(video_uri, mime_type="video/mp4")
contents = [prompt, video]

responses = multimodal_model.generate_content(contents, stream=True)

for response in responses:
    print(response.text, end="")

# 응답
# {
#   "profession": "photographer",
#   "features": "Night Sight, Video Boost",
#   "city": "Tokyo"
# }
신기해서 몇가지 더 테스트를 해보았는데, 전체적인 영상의 분위기, 색깔, 등장인물의 성별, 등장인물이 하는 행동은 답변을 잘했는데 사람이 자전거를 타는 장면이 몇초에 등장하는지, 차 운전 장면이 몇초에 등장하는지 등의 질문은 잘 답변하지 못하는 것 같았다.
prompt = """Answer the following questions using the video only:
What is the profession of the main person?
What are the main features of the phone highlighted?
Which city was this recorded in?
What's the main mood of the video?
What's the main color of the video?
Is the person in the video a man or a woman?
What is the person doing in the video?
Provide the answer JSON."""

# 응답
# {
#   "person": {
#     "profession": "photographer",
#     "name": "Seeaka Shimada"
#   },
#   "phone": {
#     "features": [
#       "Video Boost",
#       "Night Sight"
#     ]
#   },
#   "city": "Tokyo",
#   "mood": "calm",
#   "color": "blue",
#   "gender": "female",
#   "actions": [
#     "walking",
#     "taking pictures",
#     "smiling"
#   ]
# }

# 잘 대답하지 못한 prompt는 다음과 같다.
# If there is a scene with a person riding a bicycle in the video, please let me know at what time it appears.
# If there is a scene with a car driving on the road in the video, please let me know at what time it appears.
그리고 스터디잼 그룹장 님에게 처음이라 궁금한 것도 많아서 귀찮게 했는데 질문 하나하나 친절하게 답변해주셔서 감사했다. 첫 스터디잼인데 재밌게 공부한 것 같다. 다음에도 기회가 되면 참석하고 싶다.
PS. 그리고 위에서 사용한 예시 코드들은 모두 스터디 과정 중에 예시로 작성된 코드를 그대로 들고왔다.